Did you know that on average employees receive a whopping 126 emails every single day? Now imagine if you tried to process each and every one of those emails. You’d end up losing a staggering one-third of your precious day. But fear not because we’ve got your back with some game-changing Outlook tips and strategies to reclaim control of your inbox and skyrocket your productivity.
Table of Contents
1. How to use Conditional Formatting?
You can actually make important messages in your inbox stand out by using conditional formatting. For example three email messages and let’s say a colleague named Emily sent me one that really needed to focus on. To make it stand out click on the view tab up here then choose view settings. Here click on conditional formatting. Open view settings You can modify them or create your own.
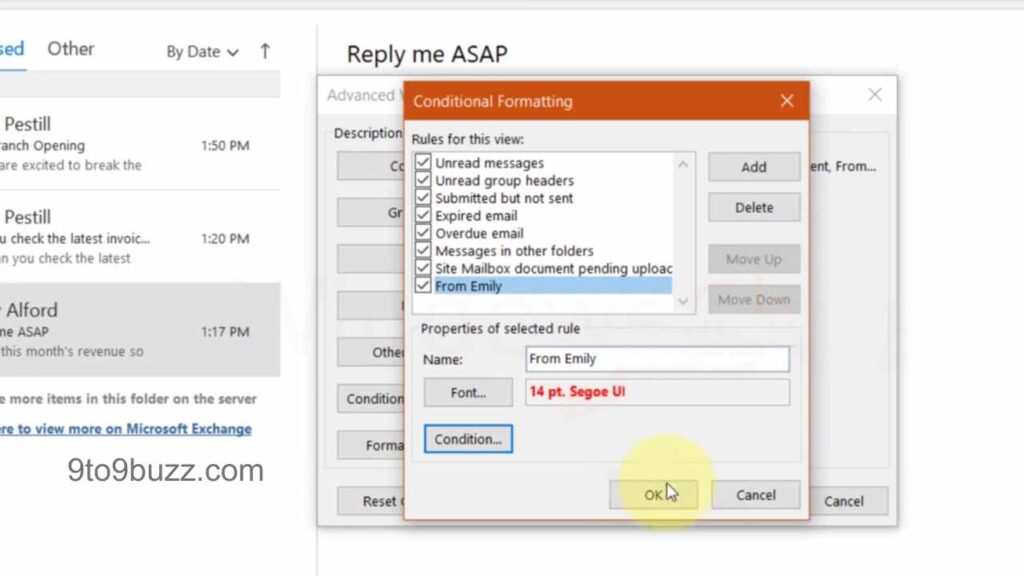
Click on Add to create a new rule and name it from Emily. Now click on fonts to make it visually appealing. you can change the color to red make it bold and increase the font size. Next, set the condition for when this formatting applies. It’s pretty flexible. You can filter messages based on various criteria. For simplicity just make it from Emily. Now when Emily’s message comes in it will totally stand out in my inbox. No more missing important stuff.
2. Setup To or CC Rule:
Suppose you have four different messages in your inbox. Peter asked a question. Peter sent another email but this time he put me on CC and it’s something I want to keep track of. Also, look at the newsletter from Alex at Jamie Shipping Company. He sent it to a bunch of people but it’s just informational. No action is needed. You know how newsletters can pile up and get overwhelming, right? Well, this rule can help you focus on what matters most. Go to the home tab, click on rules in the center, and then choose Create rule.
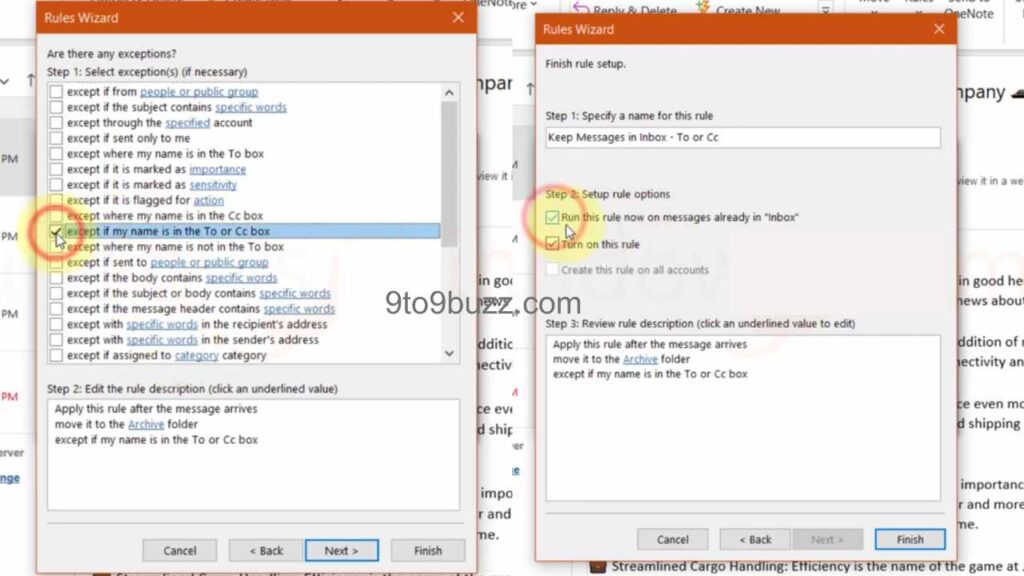
This opens up a prompt where we’ll create the rule. Now jump into advanced options. Here in the rules wizard select the condition. We want this to apply to every message that lands in our inbox so no need to select anything here just hit next. Now for messages that don’t have us on the To or CC line like Alex’s newsletter, we don’t want them to clutter our inbox but we also don’t want to delete them in case we need to refer back to them. So select to move them to a specified folder.
Click Specify and choose the archive folder. That way we can still access them if needed. Click okay then hit next. On the last screen, we can choose any exceptions but we want our to and CC messages to stay in the inbox. So we will select accept if my name is in the To or CC box. Click next again. Now give this rule a name like keep messages in inbox to or CC. You can also choose to run this rule on all messages already in your inbox. Once you’re all set click finish. It’s an excellent way to stay focused on what matters most.
3. Flag to Create Tasks From Email:
How to efficiently triage everything that lands in your inbox. With the previous tips we’ve managed to reduce the overwhelming number of messages so now you should have a much more manageable list that needs your attention. Take this first message for example. On CC and it’s something want to read. So after checking it out. Just click on archive up in the top toolbar and it’ll be moved to the archive folder.
If you ever need to refer back to it can easily find it there or even search for it. Now an email from someone with a question that requires follow-up. It’s about an important project that needs some research so can’t respond right away. So hover over this message and flag it for my task list or to-do list. Now it’s all set and want to get it out of my inbox.

so simply click on archive and it’s out of sight but not forgotten. With my inbox successfully triaged you can now switch over to the task view to focus solely on the messages that need your response. Head down to the left-hand short bar and click on tasks. There see the email from Peter with that question. Once you gather all the necessary information you can click on a task and respond to him.
One of the coolest things about flagging emails in Outlook is that they also show up in Microsoft to-do. If you use to-do as a task manager this feature is a real game changer. On the left-hand side click on the flagged email and there’s the message flagged earlier, let’s say you want to create a list of all the action items you want to focus on.
You can right-click on the message and add it to my day. When you click on my day on the left-hand side, you can see all the tasks you want to tackle today. If you’ve never used my day view before, it’s an excellent way to stay productive each day. It resets every day, giving you a clean slate to plan and organize your tasks. So there you have it, a simple way to triage your inbox and keep your focus on what really matters.
4. Follow up to Get Things Done:
Do you know what can be frustrating? When you ask someone a question or request something, they never get back to you. Outlook has a neat trick to help you remember and follow up with them. Let’s see and show you how it works. So here’s an email sent to Alex with a request, and want to make sure he doesn’t forget about it. Up above, simply click on the follow-up flag and set it to no date.

Now my message is all set to go, so click on send. Now in task view, you can easily spot the email just flagged, but it’s mixed in with all my other tasks. If you want to organize it better, so right-click on the task, and down-click all categories, then choose all categories. Here, add a new category called waiting for a response. If red make it stand out, so pick that color and click okay, and then okay again.

Back on the main view, up top, click on view, and here you can switch to categories. Now you can see all my emails were waiting for a response. So, maybe at the end of each week, go through these messages, and if haven’t heard back from the recipients, just ping them again to check for updates. That’s how you can keep track of important emails and make sure you get the responses you need.
5. Organize Emails with an Action-based Folder:
Now let’s see how to organize your emails with a folder system that actually works for you. In the past, there was an elaborate multi-level folder structure to archive emails based on different subjects. It seemed fine at first, but as the list kept growing, it became a hassle trying to figure out where to put each email, and when you needed to find something later, it turned into a search mission, defeating the whole purpose. Now, to follow a more action-based folder structure, keep things simple with just a few folders.
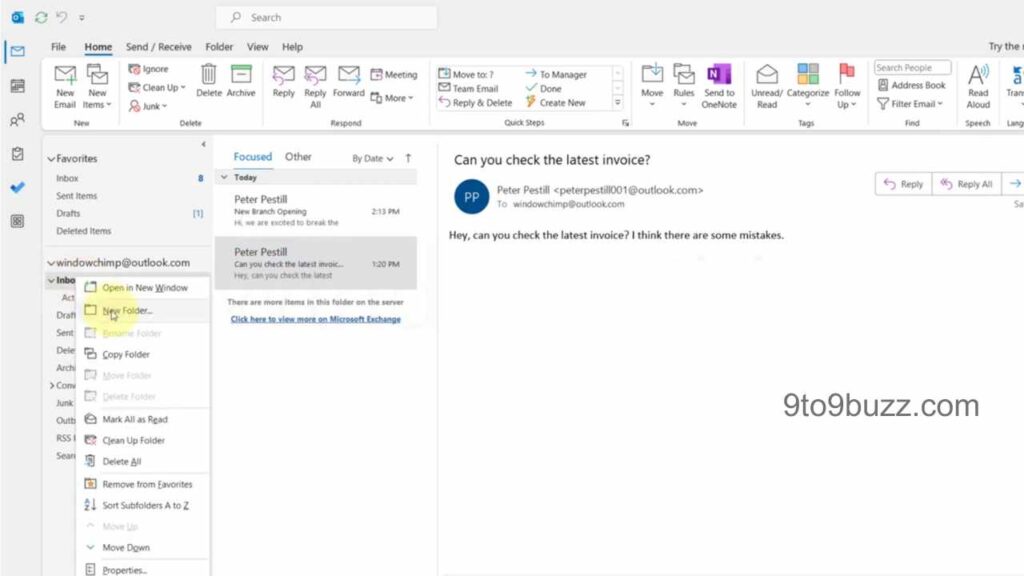
Here’s how you can set it up. First, avoid rereading emails multiple times. When you read an email, you take immediate action if it takes just a couple of minutes to complete. Like, if you need to send a receipt to accounting, do it right away. Simple tasks get done immediately to clear them off my plate. Next, if an email is something you might need to refer back to in the future or for any reason. If it’s important, click on the archive to move it out of my inbox and into the archive folder, easy to find using the search function later on.
But if it’s not needed anymore, a quick click on delete moves it to the deleted items, and make sure to regularly empty that folder. Now, for emails that require more time or action, create a new folder, simply right-click on your mailbox, select the new folder, give it a name, and hit enter. You can also drag and drop to organize your folders as you like. When you come across an email that needs more than a quick reply or can’t be deleted, use the quick steps:
- Right-click on the message
- Select quick steps
- A new quick step
- Move to folder
- Give it a name (Move to Action)
- Choose the folder
- Click finish.

Now, just click on the quick step in the home tab to move the email out of the inbox. You can even add a shortcut for it to make it even quicker. Remember, don’t create too many folders or you’ll end up with another mess. Instead, you can delegate tasks to someone by forwarding the email or using Outlook’s follow-up feature to stay on top of important emails that require action. So, with this simple folder system and some quick steps, you’ll have your inbox under control and your important emails won’t slip through the cracks.
6. Change Startup Folder Outlook Tips:
Let’s tweak the way Outlook opens so that you’ll see your action folder right from the start. This way, you’ll be greeted with the tasks you need to tackle first thing, which is super helpful for staying focused. Click on the file in the top left corner of Outlook. Choose options from the menu that pops up. Here, select the advanced tab on the left-hand side.

Now, look for Outlook start and exit in the right-hand section. Here at the start of Outlook in this folder section, click on the browse button. You’ll be able to select the folder you want as the start folder. Just find and pick your action folder. Now, every time you open Outlook, the action folder will be front and center, reminding you of what you need to focus on. No more distractions from other emails, and you won’t forget to check your action folder anymore.
7. Stop Email Notifications to Stay Focused:
Outlook has a way of constantly interrupting your workflow with all those message notifications. But don’t worry, we have a little trick to help you stay focused without those constant alerts. First, look up in the top left-hand corner and click on File, then scroll down and find Options from the menu. Once you’re in the Options, go to the Mail section. Now, look for message arrival in that area. This is where you can control what happens when you receive a new message.
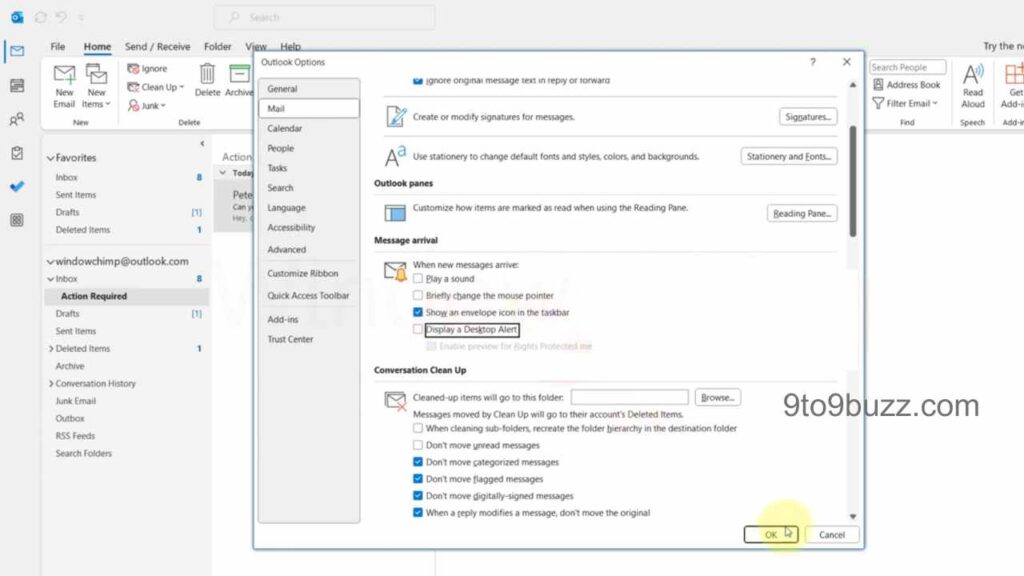
By default, you’ll probably have various options checked, like sounds, alerts, and notifications. But if you get loads of emails daily, those beeps and pop-ups can get really distracting. So go ahead and uncheck those boxes for sounds, alerts, and notifications. You’ll feel more in control of your focus, trust me. After unchecking all those boxes, just click on OK, You won’t be interrupted by constant Outlook alerts anymore, allowing you to work without distractions.
8. Work Offline for More Focused Sessions:
So here’s a handy trick for you when you want some email-free time, but still need to work on other stuff using Outlook. Just switch to offline mode and you won’t be bothered by incoming emails. To do this, go up to the Send, Receive tab, and you’ll see an option there called Work Offline. Give that a click, and now you are in offline mode, which means no new emails will come knocking on your door.
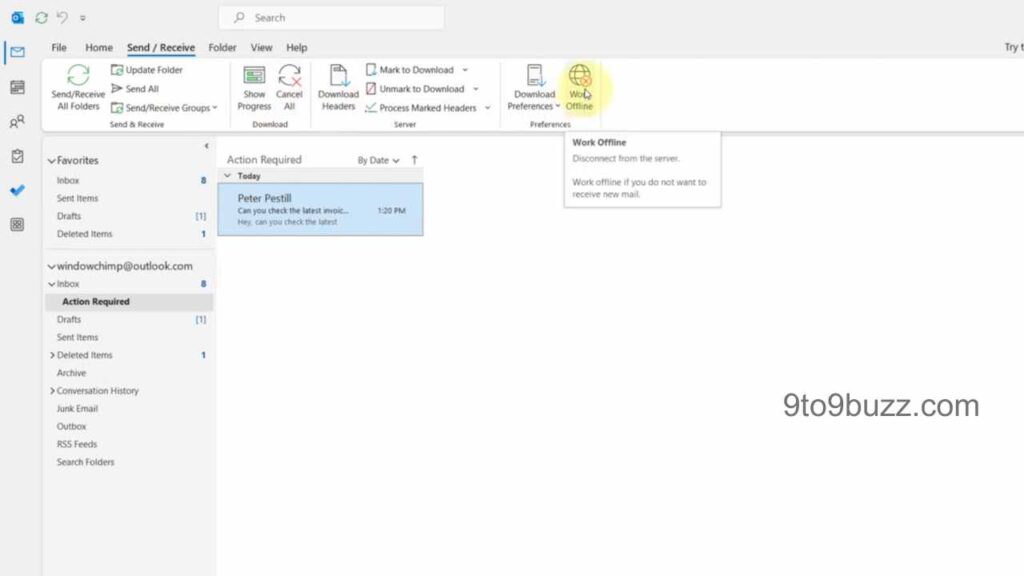
You can also check if you’re in offline mode by looking at the status bar down below, it’ll show you that you’re currently offline. Now, when you’re ready to dive back into your inbox, just click on Work Offline again, and your Outlook will update, showing you all the new emails that have arrived during your productive time.


